Using MeshCAM for Cutting 2D Parts
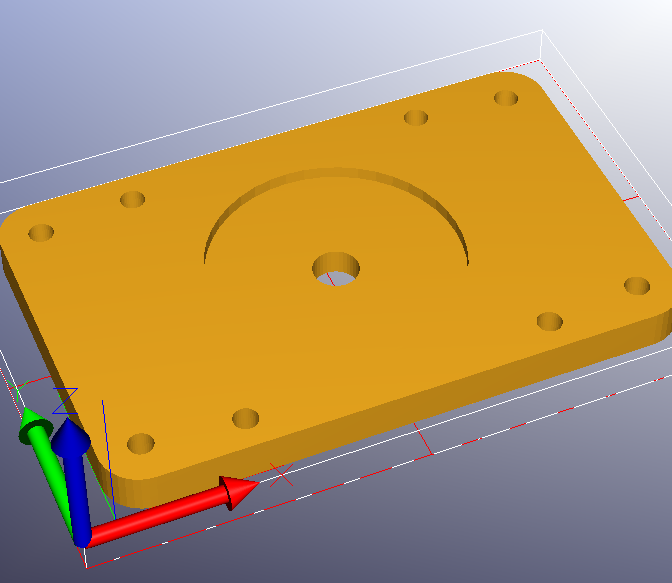
The MeshCAM CNC Software was designed primarily for 3D machining. Over time it has acquired a wide range of features and toolpath options that let it generate toolpaths for 2D files as well. For this tutorial, we'll machine a mounting plate for a NEMA 23 stepper motor. The plate was designed in Solidworks but any CAD program should be fine. The plate can be seen below:

I've exported the file as an STL that can be downloaded here. The STL file format was originally designed for 3D rapid prototyping machines. At some point it became apparent that they are very convenient for CAM programs as well; they are the most robust way to exchange 3D data without errors.
-Start MeshCAM.
-Click File->Open.
-Navigate to the NEMA23-inch.stl file.
Select "Inch" and then click OK.
Select "3-Axis".
You can now see the file in the 3D window. You can rotate the view to get a better look by dragging the mouse cursor with the left button down.

You can see the program zero on the lower left point of the geometry. The white box represents the stock to machine the part from. By default, it will be sized to fit the part exactly. We'll need to increase that a little to give the tool room to move around the part.
-Click the Define Stock button. ![]()
-Under the "XY Position" section, change the "Right" and "Back" values to .25. Note that the values for "Left" and "Front" changed as well because we have the "Center X" and "Center Y" boxes checked.
-Click OK.
Note that the 3D view updated the stock box to reflect the new stock size.
-Click the "Generate Toolpath" button. ![]()
This will open a large dialog that contains everything you need to define the toolpath. We'll break it into sections and take them one by one. We won't address every setting- just the ones that are relevant to this part.
-Enter the following values for the "Global" section:
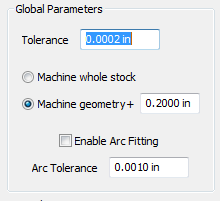
The Tolerance value defines how accurate the toolpath should be. Smaller numbers lead to a more accurate toolpath but take longer to calculate. A value of .001" is always a good starting point for a machine like the Fireball V90 but I'm going to use .0002" here so we can get good detail in the holes. The "Machine Geometry +" value defines the area that should be machined. This setting tells MeshCAM to machine the area in the stock covered by the geometry plus some extra margin. We'll use a .125" endmill so a value of .2" gives plenty of room for the tool to profile the part.
-Uncheck the "Enable Roughing" box. No roughing will be required for a part like this.
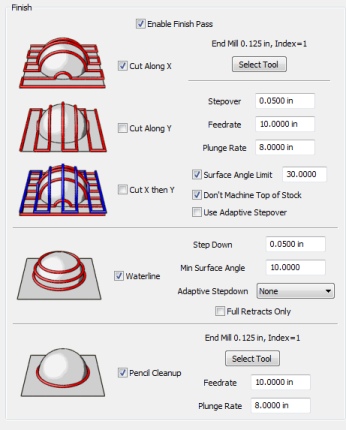
-Check the "Enable Finishing" box.
-Check the "Cut Along X" box, the "Waterline" box, and the "Pencil Cleanup" box.
-Now click the "Select Tool" button next to the "Cut Along X" box.
If this is the first time you've run MeshCAM you will not have any tools to pick from so we need to add one.
-Click the "Add" Button.
-When the new dialog appears, click the "Endmill" button and then copy the values below.
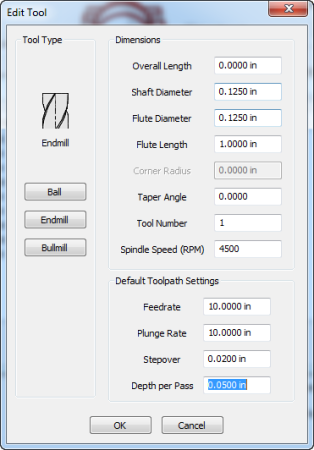
-Click OK.
The list will now show the tool we just created and it should be highlighted.
-Click Done.
-You will be asked if you would like to copy the default toolpath parameters for this tool. Click No.
-Click the "Select Tool" button under the "Pencil Cleanup" section and select the tool we created above
-Copy the settings below
-Click OK.
In a few seconds, MeshCAM will display a toolpath.
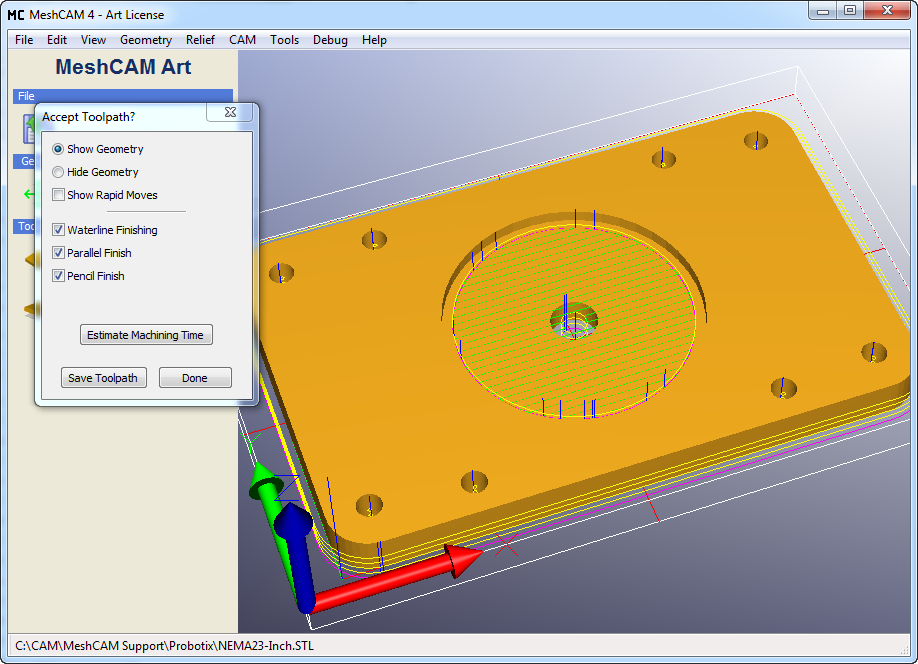
-You can individually enable/disable each pass to look at them in more detail. When you are satisfied, make sure they're all enabled and click the "Save Toolpath" button.
-Under the "Save as File Type", select "Basic-Gcode-Inch". This will give you very simple gcode with no special start or stop codes.
-Pick a file name and click "Save"
You're done! Load this in your mill and let it run.
Toolpath in Detail
We went through that pretty fast so it's worth taking some time to understand why those settings were used. I'll walk through each toolpath in more detail for those who are interested.
The waterline passes can be seen in yellow below:
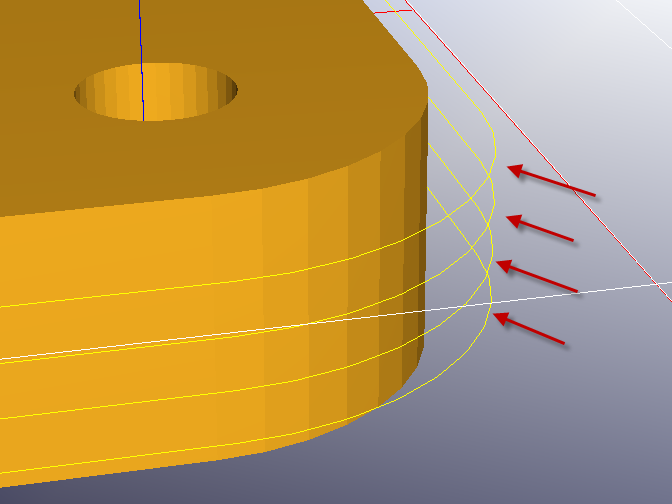
Waterline passes cut the profile of the part in a series of slices. The "Stepdown" value controls the distance between these passes. There is no requirement that the walls of the part be vertical- if the part had a draft angle MeshCAM would ensure that each layer cut the part to the correct profile without gouging.
It's easy to see that the waterline passes do nothing for flat surfaces. For that, we used parallel finishing. This can be seen below in green:
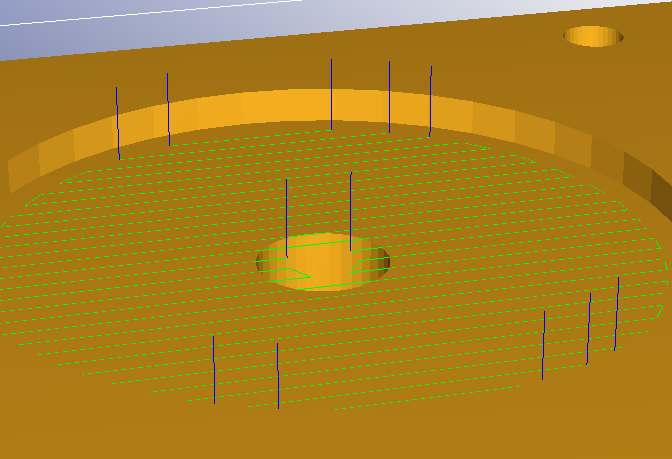
The parallel finish is just a raster path back and forth across the surface of the part. MeshCAM has a number of settings that let to limit the toolpath to the minimum required areas to reduce the machining time. First, we limited the surface angle to 30 degrees. This means that the parallel finishing will avoid any surface that is steeper than 30 degrees. In this part, we only have 0-degree and 90-degree surfaces so 30 is a good threshold to prevent the vertical surfaces from being machined here.
The "Don't Machine Top of Stock" setting told MeshCAM to avoid any part of the part that is very close to the top of the stock. Since we are starting with flat stock, this saves machining time.
The "Stepover" value controls the distance between each parallel pass.
Finally we cleaned up the corners of the pocket and perimeter with the pencil cleanup seen below in purple:

Pencil finishing is an advanced toolpath that will automatically find corners in a part to trace and clean up. The only thing you need to tell MeshCAM is how fast to move, the pencil algorithm does the rest.
The biggest benefit to using MeshCAM for this part is that once you have the settings in there, everything is automatic. You do not have to select every vector or set every depth. If you need to make changes to the part, just reload it and recalculate the toolpath- you'll have the updated toolpath in under a minute. Users who have spent time manually programming a part in a traditional 2D CAM program will understand the benefit here.
If you're looking for an even simpler 2D example, click here for a tutorial on DXF to G Code.